Custom Widgets
This guide will walk you through the process of building custom widgets for use in COSMOS Telemetry Viewer. While you can use any JavaScript framework, we'll use Vue.js since COSMOS is built with it. Before starting, you may want to check out the Widget Generator guide to create the initial scaffolding.
Step 1: Set Up Your Plugin Structure
If you have an existing plugin, start in the root directory for that plugin. If you do not yet have a plugin, start by using the Plugin Generator to create one.
If your existing plugin contains a custom tool, you may run into build issues. In this instance, we recommend having one plugin for your custom tool, and a second plugin for you custom custom widgets.
In your plugin's root directory, use the Widget Generator to scaffold the widget.
Ensure your plugin has the correct directory structure:
your-plugin/
├── LICENSE.md
├── your-plugin.gemspec
├── package.json
├── plugin.txt
├── Rakefile
├── README.md
├── src/
│   └── YourcustomWidget.vue
└── vite.config.js
Step 2: Declare Your Widget in plugin.txt
In your plugin's plugin.txt file, declare each custom widget you want to create:
WIDGET YOURCUSTOM
For example, in the COSMOS Demo plugin, two widgets are declared:
WIDGET BIG
WIDGET HELLOWORLD
Step 3: Configure Your Build Process
Set Up package.json
Ensure your package.json includes the necessary build script:
{
  "scripts": {
    "build": "vite build"
  },
  "dependencies": {
    "@openc3/vue-common": "latest"
  },
  "devDependencies": {
    "vite": "latest"
  }
}
Update Your Rakefile
Ensure your Rakefile is configured to run the build script in its :build task:
(This should happen automatically if you use our code generators mentioned above.)
task :build do
  # ...

  # Build the widget and gem using sh built into Rake:
  # https://rubydoc.info/gems/rake/FileUtils#sh-instance_method
  sh('pnpm', 'run', 'build')

  # ...
end
Step 4: Create Your Widget Component
If it doesn't exist already, create a Vue component file in the src directory, following this naming convention: YourcustomWidget.vue.
For example, to create a widget called "HELLOWORLD", you would create HelloworldWidget.vue:
<template>
  <!-- Your widget's HTML structure goes here -->
</template>

<script>
  import { Widget } from "@openc3/vue-common/widgets";
  export default {
    mixins: [Widget],
    data() {
      return {
        // Reactive data items
      };
    },
  };
</script>
<style scoped>
  /* Widget-specific styles */
</style>
Step 5: Develop Your Widget
This is where you'll design the actual layout and functionality of your widget. Let's expand on this using the Helloworld Widget as an example:
Designing Your Widget Layout
In the <template> section, you'll define your widget's visual structure. For a simple Hello World widget:
<template>
  <div class="hello-world-container">
    <h3>{{ greeting }}</h3>
    <p>This is a custom COSMOS widget</p>
    <v-btn @click="updateGreeting" color="primary"> Change Greeting </v-btn>
  </div>
</template>
Adding Widget Logic
In the <script> section, define the behavior of your widget:
<script>
  import { Widget } from "@openc3/vue-common/widgets"; // Make sure you import Widget
  export default {
    mixins: [Widget], // Make sure you include Widget in the mixins here
    data() {
      return {
        greeting: "Hello, COSMOS!",
        greetings: ["Hello, COSMOS!", "Greetings, User!", "Welcome to COSMOS!"],
      };
    },
    methods: {
      updateGreeting() {
        // Cycle through different greetings
        const currentIndex = this.greetings.indexOf(this.greeting);
        const nextIndex = (currentIndex + 1) % this.greetings.length;
        this.greeting = this.greetings[nextIndex];
      },
    },
  };
</script>
Styling Your Widget
Add custom styles in the <style> section:
<style scoped>
  .hello-world-container {
    padding: 15px;
    border: 1px solid #ddd;
    border-radius: 4px;
    text-align: center;
    background-color: #f9f9f9;
  }
</style>
Step 6: Configure Your Build Output
Ensure your vite.config.js file is configured to properly build your widgets:
import { defineConfig } from "vite";
import VitePluginStyleInject from "vite-plugin-style-inject";
import vue from "@vitejs/plugin-vue";

const DEFAULT_EXTENSIONS = [".mjs", ".js", ".ts", ".jsx", ".tsx", ".json"];

export default defineConfig({
  build: {
    outDir: "tools/widgets/YourcustomWidget",
    emptyOutDir: true,
    sourcemap: true,
    lib: {
      entry: "./src/YourcustomWidget.vue",
      name: "YourcustomWidget",
      fileName: (format, entryName) => `${entryName}.${format}.min.js`,
      formats: ["umd"],
    },
    rollupOptions: {
      external: ["vue", "vuetify"],
    },
  },
  plugins: [vue(), VitePluginStyleInject()],
  resolve: {
    extensions: [...DEFAULT_EXTENSIONS, ".vue"], // not recommended but saves us from having to change every SFC import
  },
});
Step 7: Use Your Widget in a Screen Definition
Create a screen definition file in your target's screens directory:
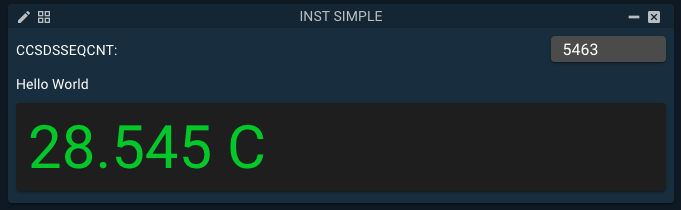
SCREEN AUTO AUTO 0.5
LABELVALUE <%= target_name %> HEALTH_STATUS CCSDSSEQCNT
HELLOWORLD
In this example, we're using the HELLOWORLD widget from the demo, which will result in a screen that looks like this:
The widget name follows the convention from plugin.txt file. The screen definition for a screen that has only your custom widget created here, ensure your screen definition looks like this:
SCREEN AUTO AUTO 0.5
YOURCUSTOM
If your widget requires telemetry data, make sure you include the target and telemetry information:
YOURCUSTOM <%= target_name %> HEALTH_STATUS TEMP1
Step 8: Build and Deploy Your Plugin
In order to build a widget, a container containing node and pnpm is necessary.
- Linux / macOS
- Windows
% docker run -it -v `pwd`:/openc3/local:z -w /openc3/local openc3inc/openc3-node sh
/openc3/local $ pnpm install
/openc3/local $ rake build
docker run -it -v %cd%:/openc3/local -w /openc3/local openc3inc/openc3-node sh
/openc3/local $ pnpm install
/openc3/local $ rake build
Notes:
- The
openc3-nodecontainer is currently missing theopenc3gem, so the gem validation will fail. This does not impact widget development. - The
openc3-nodecontainer may need to be run asrootso thatpnpmhas the permissions to createnode_modulesin the host widget directory. - If you are behind a firewall/proxy, the
NODE_EXTRA_CA_CERTSin the container may need to be set forpnpmto work. TheError: self-signed certificate in certificate chain errorsignifies the need for this env variable.
Now open Telemetry Viewer and select your screen to see your custom widget in action!
While this example is simple, the possibilities with custom widgets are limitless!